All Purpose Flour / Maida : 1 Cup
Egg: 2
Oil / Butter: 1/2 Cup
Vanilla Essence: 1 Tea Spoon
Powdered Sugar: 3/4 Cup
Baking powder : 3/4 Tea Spoon
Milk: As Required
For Chocolate Sponge
All Purpose Flour / Maida : 1 Cup
Egg: 2
Oil / Butter: 1/2 Cup
Vanilla Essence: 1 Tea Spoon
Powdered Sugar: 3/4 Cup
Coco Powder: 3 Table Spoon
Baking powder : 3/4 Tea Spoon
Milk: As Required
For Chocolate Cream Frosting
Whipping Cream:1 and Half Cups
Powdered Sugar: 5 Table Spoon
Coco powder: 3 Table Spoon
Vanilla Essence: 1/4 Tea Spoon
For Ganache
Dark Chocolate: 250gms
Fresh Cream: 200ml
Baking Time: 25 to 30 Minutes per cake
Method
Making Vanilla Sponge
Preheat the oven at 160 C
Prepare the cake tin by spreading a little butter all around the tin and then add little flour and spread it to all sides uniformly. Knock off the excess flour
Sieve all purpose flour and baking powder
Beat powdered sugar, vanilla essence and oil/butter until it becomes smooth
Add eggs one by one and beat well
To this add sieved flour mix and milk in batches and make a smooth ribbon consistency batter
Pour this to the cake tin and place in the oven
Bake at 160 C for about 25 to 30 minutes
Insert a wooden skewer in the middle and check. If it comes out clean then the cake is ready
Once it cools a bit remove from cake tin and allow to cool well
Making Chocolate Sponge
Preheat the oven at 160 C
Prepare a cake tin by spreading some butter on all sides of the cake tin and then dusting it with some all purpose flour.
Tilt and remove the excess flour from the cake tin
Sieve all purpose flour, coco powder and baking powder and keep aside
Beat powdered sugar, vanilla essence and oil/butter until it becomes smooth
Add eggs one by one and beat well
To this add sieved flour mix and milk in batches and make a smooth ribbon consistency batter
Pour this to the cake tin and place in the oven
Bake at 160 C for about 25 to 30 minutes
Insert a wooden skewer in the middle and check. If it comes out clean then the cake is ready
Once it cools a bit remove from cake tin and allow to cool well
Making Chocolate Cream Frosting
Pour the whipping cream to a bowl, add sugar, coco powder and vanilla essence
Using an electric beater beat until it becomes stiff
Making ganache
Pour the cream to a pan and heat it well. You can see small bubbles formed
Now pour this hot cream over the chopped dark chocolate and keep aside for some time
Now mix the chocolate and cream until well combined and becomes smooth
Allow it to cool and thicken
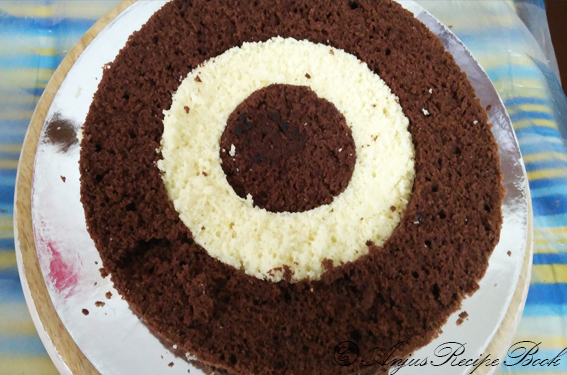
Arranging the cake layers for checkerboard pattern
Trim the crust from top and cut both the cake horizontally into 2 layers
Now we have to cut each layer of cake into 3 circles . For this you need 2 round shaped molds one big and one small. If you have a cake cutter use it or use any round bowl
Cut the cake into 3 circles as shown in the pic
Repeat the same with all the 4 layers of cake
Now arrange the layers of cake as following
First layer
Outer circle chocolate cake, then the next inner circle vanilla cake and in the center chocolate cake
Second Layer
Outer circle vanilla cake, then the next inner circle chocolate cake and in the center vanilla cake
Third Layer
Same as first layer. Outer circle chocolate cake, then the next inner circle vanilla cake and in the center chocolate cake
Fourth Layer
Same as second layer. Outer circle vanilla cake, then the next inner circle chocolate cake and in the center vanilla cake
Assembling the Cake
Place first layer of cake which has chocolate cake on the outer circle on the setting tray
Apply some chocolate cream frosting and spread well
Now place the second layer of cake which has vanilla cake on the outer circle and spread some frosting
Next comes the third layer of cake which has chocolate cake on the outer circle. Spread frosting and keep the last layer of cake which has vanilla cake on the outer circle
Apply the frosting and cover the entire cake with the frosting
Keep in fridge for some time
Take the cake out of the fridge and spread the chocolate ganache all over the cake
Decorate as per your wish and serve.
Here i have used some chocolate sprinklers and sugar pearls
Keep in fridge for some time and cut and serve
Note:
Baking time may vary depending on the oven, so adjust it accordingly
You can use any frosting of your choice.
ചേരുവകൾ
വാനില സ്പോഞ്ച് കേക്ക്
മൈദ: 1 കപ്പ്
മുട്ട: 2
സൺഫ്ലവർ ഓയിൽ / ബട്ടർ: 1/2 കപ്പ്
ബേക്കിംഗ് പൌഡർ : 3/4 ടീ സ്പൂൺ
പൊടിച്ച പഞ്ചസാര : 3/4 cup
വാനില എസ്സെൻസ് : 1 ടി സ്പൂൺ
പാൽ : ആവശ്യാനുസരണം
ചോക്ലേറ്റ് സ്പോഞ്ച് കേക്ക്
മൈദ: 1 കപ്പ്
മുട്ട: 2
സൺഫ്ലവർ ഓയിൽ / ബട്ടർ: 1/2 കപ്പ്
ബേക്കിംഗ് പൌഡർ : 3/4 ടീ സ്പൂൺ
പൊടിച്ച പഞ്ചസാര : 3/4 cup
വാനില എസ്സെൻസ് : 1 ടി സ്പൂൺ
കോകോ പൌഡർ : 3 ടേബിൾ സ്പൂൺ
പാൽ : ആവശ്യാനുസരണം
ചോക്ലേറ്റ് ക്രീം ഫ്രോസ്റ്റിംഗ് ഉണ്ടാക്കാൻ
വിപ്പിംഗ് ക്രീം : 2 cups
പൊടിച്ച പഞ്ചസാര : 1 cup
വാനില എസ്സെൻസ് : 1/2 ടി സ്പൂൺ
ചോക്ലേറ്റ് ഗണാഷ് ഉണ്ടാക്കാൻ
ഡാർക്ക് ചോക്ലേറ്റ് : 250 ഗ്രാം
ഫ്രഷ് ക്രീം : 200 ml
ബേക്കിംഗ് സമയം : 25 മുതൽ 30 മിനിറ്റ് ഒരു കേക്കിന്
തയ്യാറാക്കുന്ന വിധം
വാനില സ്പോഞ്ച് കേക്ക്
ഓവൻ 160C പ്രീ ഹീറ്റ് ചെയ്യുക
മൈദയും ബേക്കിംഗ് പൗഡറും കൂടി നന്നയി മിക്സ് ചെയ്യുക
പൊടിച്ച പഞ്ചസാരയും ബട്ടർ/ സൺഫ്ലവർ ഓയിലും കൂടി നന്നായി സോഫ്റ്റ് ആവും വരെ ബീറ്റ് ചെയ്യുക
ഇതിലേക്ക് മുട്ട ഓരോന്നായി ചേർത്ത് നന്നയി ബീറ്റ് ചെയ്തു എടുക്കുക
മിക്സ് ചെയ്തു വെച്ച മൈദ ഇതിലേക്ക് കുറച്ചു കുറച്ചു ചേർത്ത് കട്ടകെട്ടാതെ മിക്സ് ചെയ്തു വെക്കുക
ആവശ്യത്തിന് പാൽ ചേർത്ത് കൊടുക്കുക
വാനില എസ്സെൻസ് ചേർത്ത് മിക്സ് ചെയ്യുക
ഒരു കേക്ക് ടിൻ ബട്ടർ തേച്ചു അല്പം മൈദാ മാവു തൂവി വെക്കുക
കേക്ക് മിക്സ് ഇതിലോട്ട് ഒഴിച്ച് 25 മിനിറ്റ് ബേക്ക് ചെയ്യുക
25 മിനിറ്റ്ന് ശേഷം ഒരു ടൂത് പിക്ക് കേക്കിന്റെ നടുവിൽ കുത്തി നോക്കുക
അതിൽ ക്ലീൻ ആയിട്ടാണ് ഉള്ളതെങ്ങിൽ
കേക്ക് ബേക്ക് ആയി
അല്ലെങ്ങിൽ കുറച്ചു സമയം കൂടി ബേക്ക് ചെയ്യുക
പുറത്തെടുത്തു കേക്ക് ടിന്നിൽ നിന്നും മാറ്റി കേക്ക് നന്നയി തണുക്കാൻ മാറ്റി വെക്കുക
ചോക്ലേറ്റ് സ്പോഞ്ച് കേക്ക്
ഓവൻ 160Cപ്രീ ഹീറ്റ് ചെയ്യുക
മൈദയും ബേക്കിംഗ് പൗഡറും കോകോ പൗഡറും കൂടി നന്നയി മിക്സ് ചെയ്യുക
പൊടിച്ച പഞ്ചസാരയും ബട്ടർ/ സൺഫ്ലവർ ഓയിലും കൂടി നന്നായി സോഫ്റ്റ് ആവും വരെ ബീറ്റ് ചെയ്യുക
ഇതിലേക്ക് മുട്ട ഓരോന്നായി ചേർത്ത് നന്നയി ബീറ്റ് ചെയ്തു എടുക്കുക
മിക്സ് ചെയ്തു വെച്ച മൈദ ഇതിലേക്ക് കുറച്ചു കുറച്ചു ചേർത്ത് കട്ടകെട്ടാതെ മിക്സ് ചെയ്തു വെക്കുക
ആവശ്യത്തിന് പാൽ ചേർത്ത് കൊടുക്കുക
വാനില എസ്സെൻസ് ചേർത്ത് മിക്സ് ചെയ്യുക
ഒരു കേക്ക് ടിൻ ബട്ടർ തേച്ചു അല്പം മൈദാ മാവു തൂവി വെക്കുക
കേക്ക് മിക്സ് ഇതിലോട്ട് ഒഴിച്ച് 25 മിനിറ്റ് ബേക്ക് ചെയ്യുക
25 മിനിറ്റ്ന് ശേഷം ഒരു ടൂത് പിക്ക് കേക്കിന്റെ നടുവിൽ കുത്തി നോക്കുക
അതിൽ ക്ലീൻ ആയിട്ടാണ് ഉള്ളതെങ്ങിൽ
കേക്ക് ബേക്ക് ആയി
അല്ലെങ്ങിൽ കുറച്ചു സമയം കൂടി ബേക്ക് ചെയ്യുക
പുറത്തെടുത്തു കേക്ക് ടിന്നിൽ നിന്നും മാറ്റി കേക്ക് നന്നയി തണുക്കാൻ മാറ്റി വെക്കുക
ചോക്ലേറ്റ് ഫ്രോസ്റ്റിംഗ്
വിപ്പിംഗ് ക്രീമും പൊടിച്ച പഞ്ചസാരയും കോകോ പൗഡറും വാനില എസ്സെനും കട്ടി ആവും വരെ ബീറ്റ് ചെയ്തു വെക്കുക
ചോക്ലേറ്റ് ഗണാഷ്
ഫ്രഷ് ക്രീം നന്നായി ചൂടാക്കി നുറുക്കിയ ചോക്ലേറ്റിൽ ഒഴിച്ച് മാറ്റി വെക്കുക. കുറച്ചു കഴിഞ്ഞു നന്നായി ഇളക്കി തണുക്കാൻ ആയി മാറ്റി വെക്കുക
ചെക്കർ ബോർഡ് ഡിസൈൻ വരാൻ വേണ്ടി കേക്ക് ലയേഴ്സ് ഉണ്ടാക്കുന്ന വിധം
രണ്ടു കേക്കും 2 ലയർ ആയി മുറിക്കുക
ഓരോ ലയർ കേക്കിനെയും നമുക്ക് 3 സർക്കിൾ ആയി മുറിക്കണം. കേക്ക് കട്ടർ ഉണ്ടെങ്കിൽ അത് ഉപയോഗിക്കാം. അല്ലെങ്കിൽ വട്ടത്തിൽ ഉള്ള ഒരു പാത്രം ഉപയോഗിച്ച് 3 സർക്കിൾ ആയി മുറിക്കുക
2 ചോക്ലേറ്റ് കേക്ക് ലയറും 2 വാനില കേക്ക് ലയറും ഇതേ രീതിയിൽ മുറിക്കുക
ഇനി ആദ്യത്തെ ലയർ കേക്ക് സെറ്റ് ചെയ്യാം
അതിനായി പുറമെ ഉള്ള സർക്കിൾ ചോക്ലേറ്റ് കേക്ക്, പിന്നെ അടുത്ത സർക്കിൾ വാനില കേക്ക്, ഏറ്റവും നടുവിൽ ചോക്ലേറ്റ് കേക്ക്
രണ്ടാമത്തെ ലയർ
പുറമെ ഉള്ള സർക്കിൾ വാനില കേക്ക്, പിന്നെ അടുത്ത സർക്കിൾ ചോക്ലേറ്റ് കേക്ക്, ഏറ്റവും നടുവിൽ വാനില കേക്ക്
മൂന്നാമത്തെ ലയർ ആദ്യത്തെ ലയർ പോലെ തന്നെ പുറമെ ഉള്ള സർക്കിൾ ചോക്ലേറ്റ് കേക്ക്, പിന്നെ അടുത്ത സർക്കിൾ വാനില കേക്ക്, ഏറ്റവും നടുവിൽ ചോക്ലേറ്റ് കേക്ക്
നാലാമത്തെ ലയർ രണ്ടാമത്തെ ലയർ പോലെ തന്നെ പുറമെ ഉള്ള സർക്കിൾ വാനില കേക്ക്, പിന്നെ അടുത്ത സർക്കിൾ ചോക്ലേറ്റ് കേക്ക്, ഏറ്റവും നടുവിൽ വാനില കേക്ക്
ഇനി കേക്ക് റെഡി ആക്കാം
ആദ്യത്തെ ലയർ കേക്ക് വെക്കുക
കുറച്ചു ചോക്ലേറ്റ് ക്രീം ഫ്രോസ്റ്റിംഗ് തേക്കുക
ശേഷം രണ്ടാമത്തെ ലയർ വെക്കുക
വീണ്ടും ചോക്ലേറ്റ് ക്രീം ഫ്രോസ്റ്റിംഗ് തേക്കുക
പിന്നെ മൂന്നാമത്തെ ലയർ അത് കഴിഞ്ഞു നാലാമത്തെ ലയർ വെച്ച് കേക്ക് മുഴുവനായി ചോക്ലേറ്റ് ക്രീം കൊണ്ട് കവർ ചെയ്യുക
കുറച്ചു നേരം ഫ്രിഡ്ജിൽ തണുക്കാൻ വെക്കുക
ശേഷം പുറത്തെടുത്തു ഉണ്ടാക്കി വെച്ച ചോക്ലേറ്റ് ഗണാഷ് കേക്കിന്റെ മുകളിൽ ഒഴിച്ച് ഇഷ്ട്ടം പോലെ ഡെക്കറേറ്റ് ചെയ്യുക
ഞാൻ കുറച്ചു ചോക്ലേറ്റ് സ്പ്രിൻകലേഴ്സും ഷുഗർ പേർലസും കൊണ്ട് ഡെക്കറേറ്റ് ചെയ്തു
കുറച്ചു നേരം ഫ്രിഡ്ജിൽ വെച്ച് തണുപ്പിച്ചതിനു ശേഷം മുറിച്ചു കഴിക്കാം
കുറിപ്പ്
ബേക്കിംഗ് സമയം ഓരോ ഓവനിൽ ചിലപ്പോൾ മാറ്റം വരാം. അതിനനുസരിച്ചു സമയം ക്രമീകരിക്കുക
ഫ്രോസ്റ്റിംഗ് ഓരോരുത്തരുടെ ഇഷ്ടത്തിന് അനുസരിച്ചു ചെയ്യാം.
 Ingredients
 To a pan pour coconut oil and add finely chopped onion and green chilly
 Once the onion becomes soft add chopped tomato
 Tomato just needs to be soft. do not make it mushy
 Scramble the eggs. Do not wait until it becomes completely dry.
 Once the three fourth of the eggs are scrambled add the cooked green peas and combine well
 Add the rest of the garam masala and combine well
 Add some chopped onion and coriander leaves and serve hot
 ചേരുവകൾ
  മുട്ട ഒരു മുക്കാൽ ഭാഗം വെന്താൽ മതി. മുഴുവൻ ആയി ഡ്രൈ ആവേണ്ട
 ബാക്കി ഗരം മസാല ചേർത്തിളക്കുക
 മല്ലി ഇലയും , കുറച്ചു സവാള അരിഞ്ഞതും മുകളിൽ വിതറി ചൂടോടെ കഴിക്കാം.


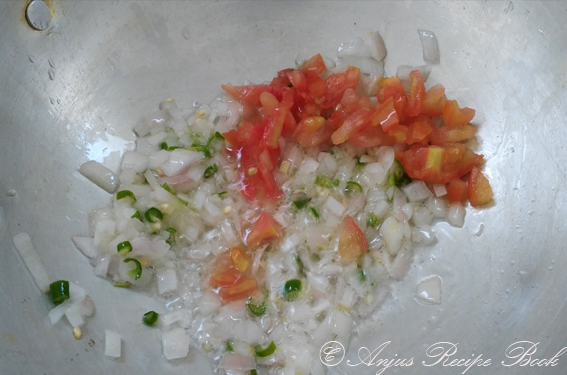


 സവാള ഒന്ന് സോഫ്റ്റ് ആകുമ്പോൾ തക്കാളി ചേർക്കുക.
 തക്കാളി വെന്തു ഉടയേണ്ട ആവശ്യം ഇല്ല. ഒന്ന് സോഫ്റ്റ് ആയാൽ മതി